Tuesday, May 28, 2013

Crafting meets Cooking

This weekend was my birthday! I got dressed up, got some books, ate some great food, and got lots and
lots of tea! (lots of tea). I love tea, I love drinking it, serving it, making pastries to go with it, and when it comes to English tea I have it pretty much down. This year however I'm looking to play out more with green teas.

They still work well with my usual tea service, but felt like it would also be fun to try bringing in some new tea traditions to the party. On the way are some first pieces toward a small Japanese tea set (and people thought I had run out of tea-wear to collect!),  and today I started taking a few baby steps into the world of wagashi, traditional Japanese sweets, often made specifically to go with green tea. Something a little different from my usual cream tea with  killer scones and home made clotted cream every now and then.

A while back we were lucky enough to try a few different kinds of wagashi from a wonderful shop in LA, and some others from Minamoto Kitchoan in Mitsuwa to get a taste for them. While I' await a big old book on the subject to drop on my doorstep, this weekend I took to the internet for some recipes and got my hands sticky trying to make a type of wagashi called nerikiri.

 The first step was to make a batch of sweet white bean paste, the second, to keep half the bean paste for fillings, the other to create the neriki, a kind of marzipan texture dough which shapes and colors like a dream. The result just like my first scones was a little spotty, but life is all about practice!

The whole process took somewhere over 3 hours, so it's not something to whip up the day you plan to serve them, but the bean paste and dough are freezable, so possible to keep on hand for faster making when the mood hits.

Typically served with matcha ( powdered green tea), the sweetness of the cakes is to play well with the bitterness of the tea, so if you go towards the top end of the sweetness scale from the online recipe, it's dialed right up to one hundred. In the future for full leaf green teas like I usually drink, I think I'll dial the sugar back a little.

The big thing with wagashi is they are supposed to be a treat for all the senses. Silky textures, good flavor, and candy for the eyes. Shaped to match the seasons, wagashi specialist's sweets look like perfect works of art! Mine, so far, maybe not so much. Had a go at hand shaping some like the pinks currently gowning in my front garden, and experimented using a petit four mold in place of the traditional wooden kashigata to see how that went (not brilliantly).

Certainly looking forward to learning and trying more when my book comes. It would be smashing to bring a bit of the surroundings to the tea plate this summer drinking tea outdoors. Next up "jelly" type wagashi. The retro hostess in me can't resist a pretty treat that wobbles!

Thursday, May 2, 2013

Tiny Tree Take Out


Every year right after the cherry blossoms fall, the apple blossom tree in our back garden bursts into life! Spreading a white canopy over my outdoor tea spot, it's one of my favorite couple of weeks during Spring. I'll admit it, I've hugged that tree, and the thought of leaving it behind when we move is one of the things that makes the idea of picking up sticks that little bit harder.

I might not be able to take the whole tree with me, but maybe, just maybe I can take the son of apple blossom with me?


Out and about town this past week with my sister and her awesome fella, we stopped by the national arboretum to take in the spring blossoms and national bonsai museum. Tucked in one of the twists and turns of their bonsai collection (which is breathtaking by the way!), was this incredible little apple blossom  bonsai! Perhaps fate? I've always wanted to grow a bonsai tree, and what better way to take my favorite tree with me? Right now I have a few cuttings lined up around the house, and going to also try growing from seed once the big tree produces fruit, as well as some late summer cuttings further down the line.basically I;m trying everything for the best chance of there being at least one that will make it to become a tree.

A great site my sister's fella, out pal and bonsai enthusiast Martin put me onto is this one bonsai4me.com, it has some great information of just about every stage. Beyond that crossing my fingers for tiny tree success, just think of the decorative and DIY possibilities in this amazing living art form?

Friday, March 15, 2013

Go Go Ghoulia!

I love my vintage, I love my Ghoulia, and I love to keep the 2 things as close together as possible! When Monster high dolls first came out, each character had such a strongly personal style. Ghoulia was my instant favorite (I was late to the game and got into them around the same time the wave 2 dolls were dropping) I loved her 60's Night of the Living Dead's Barbara style, and Thriller 80's touches. It seems the designs tend to go back and forth between the 60's and the 80's but as a vintage girl it's always been her 60's flavor I loved the best!

A while back I did a couple of custom monster High dolls dressed up in real world versions of their fashion influences,. A proper, elegant, lolita Draculaura, and 2 straight 60's Ghoulias. The 2nd one with black gingham trousers I sold, this dotty darling I kept!

She's found her way into my heart as one of my current favorite dolls, but I hadn't really had chance to photograph her until this week.

I recently acquired a giant printer/scanner for work, and aside from being great for digitizing my pattern drafting, it also prints out at the perfect size for Monster High doll backdrops. This little set of photos is the first with my printed backdrops, and one I hope really captures the retro geek chic of the lovely Ghoulia!


There are some more photos from this set over on the main Dolly Daydream site...

Tuesday, March 5, 2013

1957 Beauty Ads

You might remember an age ago me talking about collecting vintage catalogs (and now also magazines) for work research. I love pouring through the different styles from different decades, and figured you guys might as well! So I'm slowly starting to scan in bits of the collection.

 One of the latest bits of dusty old paper to come into my hands is a vintage hair stylists magazine from 1957, Pretty much everything is of course black and white, except for a few choice ads. I love the bright pops of colors with the monochrome illustrations, as well as all those delicious typefaces! Have to admit, I feel especially bad for the chick with crocodile hand.


Friday, February 15, 2013

Faking the Fringe

You probably didn't know that before there was a Quaintrelle Life blog, there was a Quaintrelle Life site! Blogs can be tough to brows when you are looking for a specific tutorial, how to, or feature, so I've been collecting and writing more in depth pieces over at quaintrellelife.com. Though left untouched for a while, a few months ago I gave the site a facelift ready to start updating again, and today the first new tutorial went up!

I have a long time love of Bettie bangs, i think they are just the right mix of retro sexy and retro cute. I don't however really have the hair to pull them off (they are always gappy and thin, yuck!)  and a also suffer greatly from commitment issues with hair (which you'll notice if you follow the link in a second...) So obviously I'm going to have to fake it if i want to enjoy the style! And fake it I do. It is possible to buy clip in bangs, but if you, like me have awkward colored hair, or are OCD about every tiny detail, then going DIY is the best option!

I made myself a set of clip in bangs in a Bettie page style, and now have a tutorial up on the QL website for anyone looking to do the same! making them is super easy to do, and because you'll have hair wefts left over, less expensive than buying a set pre-made (more tutorials for the left over hair weft to follow)


The clip ins are the secret of how I managed to get from this 1st style to the 2nd in 5 minutes instead of 5 months!

Try out the tutorial and start faking the fringe yourself!


Friday, February 1, 2013

Kanzashi Romance

I've been busy with kanzashi making the past few months, but trying not to spam up the blog too much with them. I love making the traditional geisha style kanzashi, and that's been building up into quite a collection! I also love the chance to do something a little more creative with designs as well.

I recently made up a batch inspired by vintage valentines cards and corsages for the shop perfect for valentines date outfits or valentines gifts. I made a decent name for myself back in the day making quirky kanzashi and loved trying some new things  out with these like making rose bouquets and pansies.

Also been adding little traditional mini monthly kanzashi for those interested in collecting a full calender of the flowers like me, without totally blowing the bank! 


Another thing I'm slowly working on is features on how to actually wear kanzashi since a lot of people seem to have fallen in love with them as objects over the years, but no-one seems to have much light to shed on how to use them! I started on the first steps to fixing that this week with some retro looking fashion plates featuring some of the kanzashi available in the shop worn in a 1930's inspired hair do.

Plans in the works for hairstyling tutorials to go with them too in the future. In the mean time if you are looking to buy some there are some rather nice (if I do say so myself ) traditional and retro designs in the Vivcore shop, and here are some kanzashi in action!


Wednesday, January 16, 2013

Boudoir Darlings


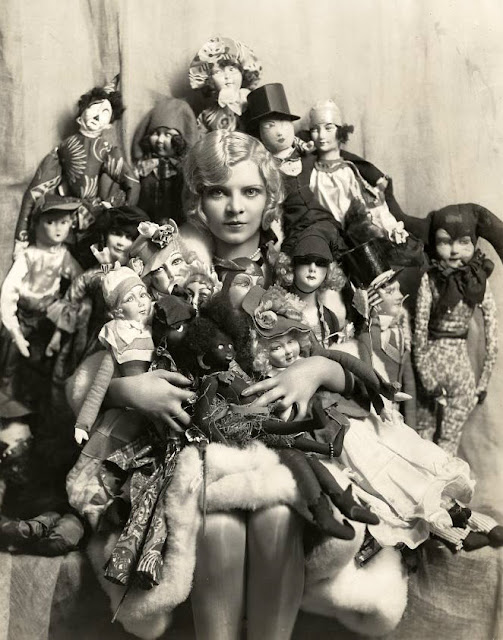
A few months ago I discovered, and became really interested in 1920s boudoir dolls. I love them because they had such a short run, just though the 20's and 30's, and are so perfectly frivolous!

For any one as late to the pary as me, boudoir dolls came about as part of the many crafts coming into Paris from Russia at that time. Relativly simple cloth bodies, painted faces, and at the time more Russian style costume. They became more and more popular and soon they were being made in fantastic18th century inspired costumes, as fashionable flappers and seedy undesirables. Women would drape them around their bedrooms and personal spaces. They represented the style of the times, and also the fantasies and daydreams of the young women holled up in these rooms. The dolls weren't only restricted to the house, some daring flappers would carry their dolls out for a night on the town. More than just a fashion doll, they were dolls as fashion accessories!

 You can spot them quite often in old movies, and they show up fairly regularly in photos of film stars and flappers through out the 20's and 30's.

I design clothing and accessories for a living, but also make and customize dolls pleasure, so these have so much appeal to me as dolls and as accessories.
 from cute but beat up to "I can't believe it stayed so clean for so long!" Trawling through listings and photos I found myself more and more wanting to make my own so that it could be just as personal as some of the dolls that appeared to be to their owners in the old photos like the one above.

It took a while, but after getting my hands covered in clay, and clothes whited out with dust, I finally managed to steal some time the other day to finish off my first boudoir doll! She looks like a Constance so that's what she's called.

She went from a creepy head on a stick to a (apparently still creepy) well dressed girl, swimming in ruffles, ribbons and art deco styling!

She has a little floss wig, picture dress, and lots of little ribbon trimmings, right down to mini knee level garters!

There's whole line of projects to work on using this doll, and it's got me started making old style dolls which is something I've been wanting to do for a while.

A few things I might do differently next time around, but over all she makes me smile, and a great starting point for bringing yet another new old thing into my life :) More photos over on Dolly Daydream (including the dolly garters!!!) along with a lot of the other dolls I've made and customized over the years.


Based on layout and code by Lena